|
Click image to enlarge
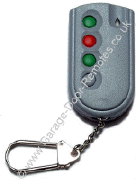 |
PDT grey single door
keyfob to SWS Seceuroglide specification
for use with a single SWS Seceuroglide roller door
including
RollerTec™
Compatible with
grey SWS Seceuroglide control units type RF02 & RF03
or SWS
RollerTec control unit types V1 - V5
(see note below)
(these transmitters have two green buttons as illustrated left)
Frequency 433Mhz - flip case and
two CR2016 lithium batteries included
programming
procedure
Discontinued, please contact us for alternatives by clicking here
|
|
|
Click image to enlarge
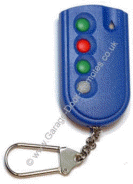
post 2005 multi-door fob |
PDT blue multi-door keyfob type 66190 to SWS Seceuroglide specification
for individual control of up to eight SWS Seceuroglide
roller doors
fitted with PDT RollerTec V1 - V5 control units
(introduced 2005)
Frequency 433Mhz - uses two CR2016 lithium batteries
programming
procedure
Availability: discontinued -
an alternative
door control system such as the
ANSA RS-1 can be installed to replace the PDT control system
Click for details |
|
|
Click image to enlarge
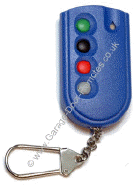
pre-2005 multi-door fob |
PDT RF02 blue keyfob to SWS Seceuroglide specification
(pre 2005 type)
for individual control of two or more SWS Seceuroglide
roller
doors which are fitted with blue type RF02 control units
Not compatible with the RollerTec™
multi-channel system introduced in 2005
Frequency 433Mhz - uses two CR2016 lithium batteries
programming
procedure
Availability: discontinued -
an alternative
door control system such as the
ANSA RS-1 can be installed to replace the PDT control system
Click for details |
Note: SWS Seceuroglide doors supplied
from 2014 onwards were shipped with Teleco
control systems, if you require a Teleco keyfob transmitter or wall control
panel please email us
Quantity Discounts
are calculated
automatically
(just enter the quantity required and click 'Buy Now')
|
|
* * * * * Very Very Important * * * * *
Our PDT keyfobs are programmed with a unique distributor code exclusively for use with
roller doors supplied by SWS Seceuroglide, consequently although identical in appearance they are not compatible
with PDT KF04 433RC keyfobs supplied by Cordula, Nationwide, RollerGlide, or any other make
of roller door ...
details
Please don't place an order until you've confirmed
that your door was supplied by SWS Seceuroglide |
How to find the distributor code |
|
PDT type RF02 & RF03
roller door
control unit
(these models have a red
push-button on the underside)
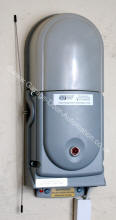
The PDT RollerTec™
control unit is
similar to the above but it has green 'up' 'stop' & 'down' buttons on the front
instead of a red button on the underside |
The distributor code is printed on a label on the integrated
circuit chip
inside a PDT type RF02 or RF03 door control box as shown below |
|
Click image to enlarge
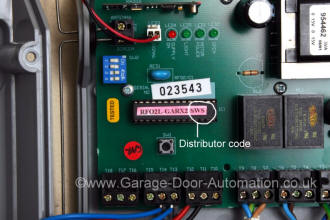
(SWS in the example shown above identifies this PDT
system
as being distributed by SWS Seceuroglide) |
|
Note: If you have a PDT RollerTec™
roller door control system
(introduced in 2005)
it can be difficult to ascertain the distributor
code
as this information is not marked on the unit but if the door was
supplied by
SWS you should find their label attached to the door |
|
Compatibility
PDT remote control systems are supplied with a unique distributor
code which is specific to each door manufacturer or distributor, if they don't
match they cannot be programmed
(the LED will flash quickly if they are not compatible.)
As we source our PDT keyfobs from SWS, (the manufacturer of Seceuroglide roller doors) all our stock is factory coded by PDT with
the unique SWS Seceuroglide distributor code, consequently our PDT transmitters
not compatible with PDT remote control systems supplied
by any other door manufacturer even though the visual appearance, product code (PDT KF04 433RC) and radio frequency are the same.
|
|
We are unable to supply PDT transmitters for use with any
other distributor code Regretfully PDT will not supply their transmitters coded to any other distributor code due to contractual agreements between them and their distributors.
(e.g. door manufacturer such as RollerGlide, Cordula, Nationwide, SWS etc.)
Radio Frequency
Early PDT roller door transmitters operated on the 418Mhz radio
frequency and are identified by having a black 4th button (at the key chain end) this 4th button is grey on 433Mhz types.
the 418Mhz type are no longer available. |
|
|
Programming Instructions
Procedure for programming an additional transmitter
to a PDT RollerTec V1 - V5 control unit.
(introduced in 2005)
Grey 4-Button keyfob - Maximum 30 Transmitters1/ Move the DIP switches on Block 1 to: 1 off, 2 off, 3 off, 4 on Wall Unit LED will flash
amber
2/ Press the open button on the PCB Wall Unit LED will flash green
3/ Now press the top green button once on each new transmitter. Wall Unit LED
will go solid for 2 seconds for each transmitter added
4/To exit programming mode set DIP switch 4 to OFF
Clearing
transmitters from the
memory (RollerTec V1 - V5)
(recommended
if a handset has been lost or stolen)
1/ Isolate the power to the unit.
2/ Go to the unit on the wall and remove the cover (Take Care: Lid is attached
to circuit board)
3/ Turn DIP switch 1, 2 & 3 OFF and 4 ON, wait 2 seconds. The lid-mounted
signal LED will give a quick YELLOW flash.
4/ Press and hold down the stop button on the board until the following sequence
has been carried out:
The flashing LED will change from flashing YELLOW to a fast flashing RED. After
10 seconds it will turn solid RED, after a further 5 seconds it will turn solid
YELLOW and then after a further 2 seconds solid GREEN for 2 seconds. You must
release the stop button when the LED is GREEN.
5/ To exit programming mode set DIP switch 4 to OFF
Note: the distributor code for the transmitter must match the distributor code for the
receiver, if they do not match, you cannot add that particular transmitter on to
the system, the LED will flash RED, GREEN then YELLOW once quickly if they are
not compatible.
Procedure for programming an additional
transmitter
to a PDT RF03 roller door control unit
Grey 4-Button keyfob - Maximum 14 Transmitters
1/ Isolate the power to the unit.
2/ Go to the unit on the wall and remove the cover (Take Care: Lid is attached
to circuit board)
3/ You will see a blue block in the top left hand corner of the board. In the
block are four mini white switches.
4/ Make a note of the current position of these switches.
5/ Change the settings of the switches to 1 on, 2 off, 3 off, 4 on
6/ Turn the power to the unit back on.
7/ Take the key fob that needs loading on to the system. Press the top green
button once, the light on the front of the unit will flash once. |
|
8/ Repeat step 7 for any other key fobs that need adding to the
system.
9/ Isolate the power to the unit.
10/ Reset the dipswitches to their original setting
11/ Turn the power back on to the unit.
Clearing transmitters from the
memory
on
a PDT RF03 roller door control unit
(recommended
if a handset has been lost or stolen)
1/ Isolate the power to the unit.
2/ Go to the unit on the wall and remove the cover (Take Care: Lid is attached
to circuit board)
3/ You will see a blue block in the top left hand corner of the board. In the
block are four mini white switches.
4/ Make a note of the current position of these switches.
5/ Change the settings of the switches to 1 off, 2 on, 3 off, 4 off
6/ Power up the unit for 10 seconds
7/ Reset the dipswitches to their original setting
8/ Turn the power back on to the unit.
Procedure for programming an additional
transmitter
to a PDT RF02 roller door control unit
Grey 4-Button keyfob - Maximum 14 Transmitters
1/ Isolate the power to the unit.
2/ Go to the unit on the wall and remove the cover (Take Care: Lid is attached
to circuit board)
3/ You will see a blue block in the top left hand corner of the board. In the
block are four mini white switches.
4/ Make a note of the current position of these switches.
5/ Change the settings of the switches to 1 on, 2 off, 3 off, 4 off
6/ Turn the power to the unit back on.
7/ Take the key fob that needs loading on to the system. Press the top green
button once, the light on the front of the unit will flash once.
8/ Repeat step 7 with any other key fobs that need adding to the system.
9/ Isolate the power to the unit.
10/ Reset the dipswitches to their original setting
11/ Turn the power back on to the unit.
Clearing transmitters from the
PDT RF02 memory
(recommended
if a handset has been lost or stolen)
1/ Isolate the power to the unit.
2/ Go to the unit on the wall and remove the cover (Take Care: Lid is attached
to circuit board)
3/ You will see a blue block in the top left hand corner of the board. In the
block are four mini white switches.
4/ Make a note of the current position of these switches.
5/ Change the settings of the switches to 1 off, 2 on, 3 off, 4 on
6/ Power up the unit for 10 seconds
7/ Reset the dipswitches to their original setting
8/ Turn the power back on to the unit. |
|
Batteries & Accessories |
|
 |
Two 3 Volt Lithium 'coin' batteries type CR2016
(two are used in current Seceuroglide keyfobs)
price (for two)
£
excl. VAT
|
|
|
 |
3.6V 2.6 Ah Lithium
thionyl chloride AA battery
Saft ref: LS14500/CR14500
Diameter 14.65mm Length 50.3mm
two used in current SWS Seceurosense (Teleco) bottom safety edge
detector
price each
£
excl. VAT
|
|
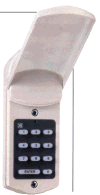
Domino numeric
digital entry keypad |
Domino
external digital numeric entry system
The DOMINO keyless digital entry system is a simple
and secure way to open and close your garage door
without the need for a key or remote control
(three 'AA' batteries included)
Our Ref: GD-1
|
|
www.garage-door-remotes.co.uk
are a specialist
mail order supplier of remote control transmitters
we do not supply any other spares for Seceuroglide doors
|