|
| |
Programming
procedure for
Seip remote control transmitters
|
|
Coding procedure for Seip SKR433 midi keyfob & SKRJ433
mini keyfob and
light switch style wireless door control panel.
Note: The programming method use will depend
upon which Seip
product you have so you must follow to appropriate instructions. |

Seip SKRJ433
mini keyfob |
Programming SKR series keyfobs to the integral receiver within
the following
Seip garage door
operator models:
RP60A, TM50, TM60. TM80 TS75 or TS100 |
Method One:
Stand inside your garage with an existing working keyfob and use it to open and close the door, then within five seconds
press and hold the two buttons on the original mini keyfob simultaneously for five seconds (Note: if
you have an 'oval midi' type keyfob, use
the centre top & bottom buttons. If you have the early type midi keyfob
use the upper two buttons) until the courtesy light starts
flashing to indicate that the receiver has entered into programming mode.
Now take the new keyfob and press the button that you wish to
use to operate your door and hold for one second, your new handset should
now operate your garage door, repeat as above for any additional new keyfobs.
Method Two: If you have lost the original keyfob it will be
necessary to release the fixing screw at the rear centre of the motor casing
and open the hinged cover, locate the red pushbutton which is located on
the main printed circuit panel and press this button for five seconds until
the courtesy light starts flashing to indicate that the receiver has entered
into programming mode. Take the new keyfob and press the button that you wish to
use to operate your door and hold for one second, your new handset should
now operate your garage door. |
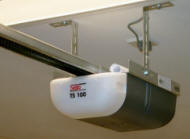
Seip TS series electric operator |
Clearing the remote control memory on
Seip RP60A, TM50, TM60. TM80 TS75 or TS100 door operators
(necessary if a keyfob has been lost or stolen)
Release the fixing screw at the rear centre of the
motor casing and open the hinged cover, locate the red pushbutton which is
located on the main printed circuit panel and press & hold this button for 20
seconds.
This will erase all
previously memorised fobs, follow 'Method Two' above to re-programme your
remaining keyfobs |
|
|
| Programming SKR series keyfobs to a
Seip EKR1MCG or EKR1MCT receiver
(white receiver upgrade module) |
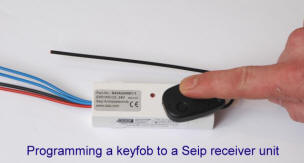
Step 1:
(power must be connected to the receiver)
Take a new or existing Seip SKR series mini or midi style keyfob transmitter and
hold it against the top of the receiver casing
(as illustrated right)
and press any button for about one second until the red
light on the receiver unit illuminates, it will remain lit for approx. 30
seconds to give you ample time to complete step 2 (if you are unable to get the red
LED to illuminate try holding the keyfob against the receiver in an different
position)
Step 2:
Take the new keyfob you wish to programme and press the
button you'd like to use briefly and the red light should go out.
Take the keyfob away from the receiver & press
the
button again and it should now operate your receiver.
Repeat the steps 1 & 2 again to programme up to 15x Seip
SKR433 series keyfobs or wireless wall switches. (version DMCG 2V2 receivers can
accept up to 25 x keyfobs) |
 |
Clearing the memory on a
Seip EKR series receiver
(necessary if a keyfob has been lost or stolen)
Take any pre-programmed keyfob transmitter and hold it against
the receiver casing beside the antenna and press and hold the
programmed button for about ten seconds until the red light goes out.
This will erase all previously memorised keyfobs, follow the
programming instructions above to re-teach your remaining keyfobs. |
|
click here
to download a colour illustrated programming guide
(large PDF file download - Adobe Acrobat Reader needed)
 |
|
|
|
|

compatible |
Alfa Romeo
Aston Martin
Audi
Bentley
BMW |
Chrysler
Jaguar
Lamborghini
Land Rover
Lexus |
Maserati
Maybach
Mercedes-Benz
MINI
Porsche |
Rolls-Royce
Tesla
Toyota
Volkswagen
Volvo |
|
Note: the car must have a UK or European spec. Homelink system with software rev. 6 or later (to
verify, refer to Homelink Instructions)
Programming a Homelink in-car remote to a
Seip RP60A,
TM50, TM60. TM80 TS75 or TS100 operator
You'll need to perform this operation in two stages, firstly you
must use the keyfob supplied with the Seip door operator to programme the
desired Homelink in-car remote control button according the
Homelink programming
instructions then use 'Method One' or 'Method Two' above to put the Seip
door operator into 'learn mode'. Then (within 60 seconds)
you must press the Homelink in-car button you programmed earlier and this button
will be memorised & stored into the Seip door operator. This completes the
programming procedure and your in-car button should now operate the Seip door
operator. Repeat this procedure for up to three separate Seip door
operators Programming a Homelink in-car remote
control system to a
Seip EKR1MCG or
EKR1MCT receiver*
You'll need to perform this operation in two stages, firstly you must use the
keyfob supplied with the Seip receiver kit to programme the desired Homelink
in-car remote control button according the
Homelink programming
instructions then use the Seip keyfob to put the Seip receiver into 'learn
mode' by holding it against the casing of the Seip receiver as detailed in step
1 above. Then (within 60 seconds) you must press the
Homelink in-car button you programmed earlier and this button will be memorised
& stored into the receiver. This completes the programming procedure and
your Homelink in-car button should now operate the Seip receiver. Repeat the
above procedure for up
to three separate receivers to control other doors or gates. (*Note: only Seip EKR1MC
series receivers marked 'DMCG 1V1'
or later are compatible
with Homelink) |
|
| Programming
procedure for
early Seip remote control transmitters
|
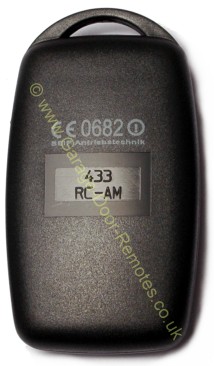
Seip 433
RC AM Rolling Code System (supplied with Seip
operators from approx 1999 to 2002)
The Seip 433 RC AM rolling-code system has over a billion code combinations enabling
every Seip keyfob to have a unique security code signature so that no two
remotes will have the same code. Your Seip
operator has a receiver capable of learning the unique codes of up to 250
separate keyfobs |
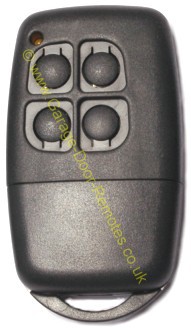
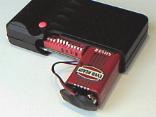
Seip
midi keyfob
433 RC-AM
Front Back
Click images to enlarge

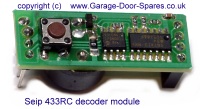
self-learning
decoder PCB

German Quality
at your Fingertips ! |
|
Programming procedure for 433 RC AM keyfobs
Method 1 (use this
procedure only if you have an existing working midi keyfob
transmitter with four buttons and a Seip model A45, A60, C75 or C100
operator)
1. Briefly depress the two lower buttons on the original handset
simultaneously, a beeping sound should now be heard from the motor unit to
indicate that the receiver has entered into 'code learning mode' You have
10 seconds to perform the next step.
2. Take the new midi keyfob and press the button that you wish to use to
operate your door and hold briefly
3. Your new handset should now operate your garage door.
Note: If you have more than one Seip motor in your garage it will be
necessary to switch off the power to each motor in turn to avoid both
receivers entering the 'code learning mode' together, or use method 2
Method 2 If you are unable to use method 1 above because you don't have
an original working keyfob with four buttons or you have a Seip model M50
operator it will be necessary to release the fixing screw at the rear centre
of the motor casing and open the hinged cover and proceed as follows:
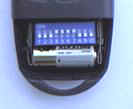
1. Locate the programming button on the decoder PCB inside the motor casing,
(see photo right) and press it briefly (a yellow LED will flash on the
decoder PCB or a bleeping sound will be heard), you have 10 seconds to
perform the next step.
2. Take the new handset and press the button that you wish to use to operate
your door for one second.
3. Your new handset should now operate your garage door.
(Note: the Seip receiver modules type WAM1K & WAK1K have a small black
programming button on the casing)
Clearing the
memory - (recommended
if a handset has been lost or stolen)
Refer to Method 2 above but at step 1. press and hold the programming button
for 20
seconds
then follow steps 1, 2 & 3 to re-program your remaining keyfobs |
|
|
|
|
|
 |
Prefer something smaller ?
Seip's mini keyfob upgrade kit can be fitted
to any garage door operator click
for details |
|
|