Installation Instructions - Sentry 433Mhz 'code hopping' radio control system SEN/H/R1
Compatibility
Suitable for use
with all remote controlled garage door operators having an external
receiver connected with three terminals
Positioning
The receiver unit
should be mounted in a position away from metal obstructions and as high
as is practical. In most cases range will be increased by mounting the
receiver vertically with the brown aerial wire hanging downwards. The
receiver unit can be screwed into position or mounted with self-adhesive
Velcro pads.
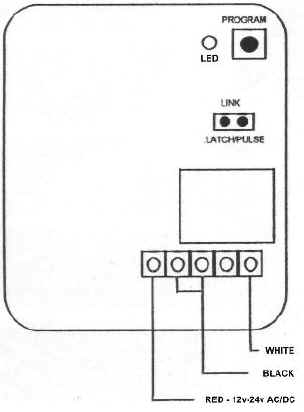
Electrical Connections
The receiver is
supplied pre-wired with coloured wires, connect the wires to the garage
door opener motor unit as follows :-
Connect
black wire to electric operator terminal 1
(common - negative/ground)
Connect white wire to operator terminal 2
(normally open - relay contact)
Connect red wire to operator terminal 3
(12V - 24V DC/AC power supply source
Note Telectron & Intercontinental receivers have the black & white coloured wires transposed so you will need to allow for this when connecting the new Sentry receiver
Position the brown aerial wire away from metalwork or other wiring
Range - up to 100Mtrs
433.920Mhz MPT 1340 UK approved frequency
![]()
![]()
Mode of
operation
the receiver can be configured in one of two operating modes :-
momentary mode - the relay is energized when the keyfob
button is pressed and releases when the button is released.
(use momentary mode for garage door & gate control)
latch mode - the relay is switched on when the keyfob button
is pressed and remains on until the button is pressed again. - this mode
is selected by connecting the jumper plug across the two pins on the
P.C.B.

Sentry SEN/H/R1 receiver unit
Digital code system
The keyfob transmitters
communicate to the receiver
by digitally coded transmission. Each transmitter
is factory pre-programmed with a unique set of security codes
from a choice of 260 million different codes and 'hops' to a new
code after every operation. The receiver can learn & memorize
the unique security code signature of up to eight individual
keyfob transmitters.
Your receiver will be pre-programmed ready for use with any keyfobs purchased with it, but will require programming if any further keyfobs are added.
Programming instructions
1. Remove the receiver cover and locate the small red 'Program'
button on the printed circuit board and press it briefly, the LED next
to the button will flash once to indicate that the receiver has entered
into 'code learning mode' (the 24v power must be connected)
2. Hold the new keyfob transmitter two metres away from the
receiver and press and hold any button until the receiver LED
flashes three times.
3. Repeat steps 1. & 2. above to program a total of up to eight fobs.
4. Exit programming mode by repeatedly pressing the red 'program'
button until the receiver LED illuminates for one second, your fob(s)
should now operate your receiver.
|
|
Clearing
the memory keyfob
Battery Replacement |
433Mhz
single channel 'code hopping' radio control system
Stock No. SEN/H/R1